
Wednesday, September 7, 2016

Wednesday, August 17, 2016
Thursday, October 9, 2014
Pineapple Block

I found a fabulous tutorial on doing a pineapple block at Crazy Mom Quilts. Here is the link: http://crazymomquilts.blogspot.com/
I've been wanting to try my hand at a pieced quilt. My mom is always making beautiful quilts and is an inspiration to me. But I needed to start with something kind of simple and straight forward. This is it.
I'm going to take a little different approach in color schemes than in the tutorial and try to keep all the blocks semi-matching. So they will all begin in the center like the pictured block.
The other thing I did different was to make the center pieces slightly larger. I cut my center square 3" instead of the 2 1/2" suggested in the tutorial.
Now I'm excited to finish all the centers so I can decide what the next colors will be. I'm leaning toward some cream colored floral prints.
Friday, July 19, 2013
Elderberries Promising
Last year the birds ate all my elderberries. But then, that seems to be generally how last year went. After the dogs and raccoons killed the chickens, the deer ate the pears and squash and few other things we grew successfully. But this year, the garden shows so much more promise. Mostly a difference in how much effort we've put in.
Look at these elderberries.
 You can see the birds have still gotten some of them, but they seem to be leaving them alone now. I wonder if they like them at a certain stage and then as the elderberries get bigger, they aren't so appealing. Works for me. I was afraid I might have to figure out how to cover the bushes with something protective to have any elderberries. This felt like an overwhelming task, since the bushes are getting pretty tall and bushy.

So what can you do with elderberries?
I planted the bushes for medicinal purposes. Elderberries, along with yarrow and peppermint, make a great glycerite that I use for the cold and flu season. It's nice, because it tastes pleasant and the kids don't mind taking it. The combination helps to build the immune system and works to keep them from getting sick. Whenever we hit that season and the colds and other sickness start going around, I tell the kids to take a couple doses a day, hoping to avoid any sickness.
It seems to help. We are generally pretty healthy.
However, this is not the only thing I do with the elderberries. When I first got married, my mother-in-law had made elderberry jelly. I thought it was one of the yummiest things I'd ever tasted. So two years ago, when we did have elderberries, I made some. My kids agree with it being the yummiest. There was only enough for a few bottles of jelly and they were prized and carefully rationed. When we pulled out the last one it was a sad, delicious moment.
This year, there will be more jelly. My kids will love me for that.
Look at these elderberries.


So what can you do with elderberries?
I planted the bushes for medicinal purposes. Elderberries, along with yarrow and peppermint, make a great glycerite that I use for the cold and flu season. It's nice, because it tastes pleasant and the kids don't mind taking it. The combination helps to build the immune system and works to keep them from getting sick. Whenever we hit that season and the colds and other sickness start going around, I tell the kids to take a couple doses a day, hoping to avoid any sickness.
It seems to help. We are generally pretty healthy.
However, this is not the only thing I do with the elderberries. When I first got married, my mother-in-law had made elderberry jelly. I thought it was one of the yummiest things I'd ever tasted. So two years ago, when we did have elderberries, I made some. My kids agree with it being the yummiest. There was only enough for a few bottles of jelly and they were prized and carefully rationed. When we pulled out the last one it was a sad, delicious moment.
This year, there will be more jelly. My kids will love me for that.
Friday, July 12, 2013
Growing Flax
I finished my first home-spun project, a scarf made of wool from Alfred, my English Angora. I sent it to Peru with my daughter and can't find the picture we took before she left.
However, I have another fun fiber project I'm working on. Growing flax.

It's hard to see the little blue flower buds on top, but there are a couple there.
This is a special flax that is grown for the fiber in the stem of the plant. I only have a few plants this year, but plan to collect the seeds and grow more next year. I'll have just enough stems to play with though.
The process of spinning flax into linen seems involved to me. I can't picture how you can ever get enough flax that is ready to spin into a piece of fabric. Evidently there are several steps that involve breaking down the fibers in the stem into something soft enough to be carded and spun. Sounds like alot of work and I don't know that I'll ever do enough to make anything, but I'm fascinated with different fibers.
What's funny is that I tell people I'm growing flax, and of course they assume I'm growing it for the seeds. That's a pretty reasonable assumption, especially since most people don't think about fiber coming from the stem of this plant. I didn't.
However, I have another fun fiber project I'm working on. Growing flax.

It's hard to see the little blue flower buds on top, but there are a couple there.
This is a special flax that is grown for the fiber in the stem of the plant. I only have a few plants this year, but plan to collect the seeds and grow more next year. I'll have just enough stems to play with though.
The process of spinning flax into linen seems involved to me. I can't picture how you can ever get enough flax that is ready to spin into a piece of fabric. Evidently there are several steps that involve breaking down the fibers in the stem into something soft enough to be carded and spun. Sounds like alot of work and I don't know that I'll ever do enough to make anything, but I'm fascinated with different fibers.
What's funny is that I tell people I'm growing flax, and of course they assume I'm growing it for the seeds. That's a pretty reasonable assumption, especially since most people don't think about fiber coming from the stem of this plant. I didn't.
Saturday, July 6, 2013
Bean Trellis
Usually I plant bush beans. But when we went to get them, the bush beans were out. I'm wondering if I will get a better yield with pole beans anyway, so it seemed like a good year to experiment with it.
They're ready to have a trellis though and I'm still trying to figure it out. And keep up with the sticker weeds. You can see some of those on the left at the bottom of this picture. They are miserable.

I looked at what my dad has done and analyzed what I already owned that I could work with. We have a stack of 2x4 boards from when we disassembled the play area. I'm going to put three of these boards in each row and then work from there. I guess it's time for a trip to Home Depot, to figure out what else I need.
They're ready to have a trellis though and I'm still trying to figure it out. And keep up with the sticker weeds. You can see some of those on the left at the bottom of this picture. They are miserable.

I looked at what my dad has done and analyzed what I already owned that I could work with. We have a stack of 2x4 boards from when we disassembled the play area. I'm going to put three of these boards in each row and then work from there. I guess it's time for a trip to Home Depot, to figure out what else I need.
Friday, July 5, 2013
Kakai Pumpkins
It's harder to find time to blog this time of year, because every spare minute finds me working outside in the garden. But the garden is part of self-sufficiency, which this blog is based on. And I'm growing some fun plants this year. Some of them I've never grown before, like my kakai pumpkin. It just got it's first bloom. A little slow, but promising.

The exciting thing about this pumpkin is that is grows hull-less seeds that you can eat without having to shell. I've always loved pumpkin seeds, but it is debatable whether its worthwhile to roast them and remove the shell from every seed before you consume it. I've wondered how they hull all those seeds they sell. But I guess they don't. They grow hull-less seeds like the ones in this pumpkin.
I'm pretty excited to see this plant grow a bit more and get some more blossoms so we can produce pumpkins.

The exciting thing about this pumpkin is that is grows hull-less seeds that you can eat without having to shell. I've always loved pumpkin seeds, but it is debatable whether its worthwhile to roast them and remove the shell from every seed before you consume it. I've wondered how they hull all those seeds they sell. But I guess they don't. They grow hull-less seeds like the ones in this pumpkin.
I'm pretty excited to see this plant grow a bit more and get some more blossoms so we can produce pumpkins.
Saturday, December 8, 2012
Make Butter, Part 2
This is a continuation of Make Butter, Part 1.


After making several batches of butter I ran out of
little bowls to put the butter in and needed a new method. This is
what I came up with. It worked beautifully. The next time I do this
I will skip the bowls and go right to making cubes. See what you think.

I made the butter into something that looked much like
a cake. To do this I spread the butter into a cookie sheet as I finished
each batch and piled it up on itself.

As it got higher I used my hands,
a spoon and a spatula to mold the butter into what really did look
like a big cake at that point. This took awhile and I was able to
fit many batches of butter on the cookie sheet.

When it was all molded as I desired I cut it into cubes.
Fortunately, it was cold outside so I let it sit in the van overnight
so it would freeze without being bothered. The obvious alternative
to this is to stick it in the freezer.

The next morning I was able to pop each cube out of
the cookie sheet easily. I wrapped each cube in freezer paper (wax
paper would also work) and stored them in a freezer bag so they won't
come upwrapped. This will also help them to be protected in the freezer
and last for a long time.
One more thing.

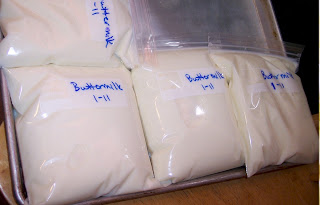
Buttermilk!
It is not the same as cultured buttermilk, but is sweet
when you first strain it off the butter. We did several things with
the buttermilk. First we tried making hot chocolate with it. It was
delicious. However, it soured quickly, since the whipping cream was
close to date (which is why it was so inexpensive in the first place).
The other thing we have been using the buttermilk for is pancakes.
The were awesome and it doesn't really matter whether the milk has
gone sour when you are making pancakes or baking with it.

So I stored
the buttermilk in quart freezer bags and put it in the freezer. The
only caution about this is to let it freeze before you pile another
bag on top of it. Otherwise you may be surprised to find a mess in
your freezer because the bag didn't stay sealed. Happy baking!
Friday, December 7, 2012
Make Butter, Part 1
We can't all live on a farm. But that doesn't mean we
can't make butter. Here is my experience with doing exactly that.

At my local grocery store I discovered they have marked
their half pints of whipping cream down to 10 for a dollar. I've sometimes
seen them do this after the holidays if they have overstocked on cream
or other products. After doing some math I estimated that if I purchased
the whipping cream and made butter with it I would stock my freezer
with butter for an approximate cost of 40 cents per pound. Right next
to the whipping cream I priced the butter at $2.57 and decided that
was a huge savings to go with the huge mess I would make.
Here are the steps for making butter.

Pour the cream into a bowl and use your mixer to whip
the cream. When the cream is whipped keep mixing. It will get thicker
and thicker and finally separate so you have chucks of butter that
have separated from the milk.

Drain as much milk as you can off.

Then you have to squeeze
the butter somehow. I'm sure there are tools for this, but I just
press it with a spoon to push the milk out of all the little pockets
in the butter.

At some point we tried a new way of squeezing the milk
out. We washed our hands really well and then used our hands to squeeze
the milk out. It gets your hands a little messy, but worked much more
efficiently than the spoon method.

Once you have squeezed as much milk from the butter
as you can it is nice to add a bit of salt to taste if that is your
preference.

Mix it in well and put the butter into a container for
storage. This butter freezes well so if you are ambitious you can
make enough to stock up for awhile and be eating butter for months.
Happy butter making! Watch for those after holiday deals
and have a great and self-sufficient New Year.
Tuesday, December 4, 2012
Leibster Award
I was nominated a few days ago for the leibster award by http://redletterdaybags.blogspot.com/.
Looks like fun and I'm taking the challenge. There are a few things required of the nominees, which I've copied from my sponsor.
The rules are:
I'll start with 11 things about myself.
I'm loving this. I hope the people I nominate have as much fun as I have. Here are my nominees (actually they are coming one at a time):
And here are their questions.
Looks like fun and I'm taking the challenge. There are a few things required of the nominees, which I've copied from my sponsor.
The rules are:
- Each person tagged must post 11 things about themselves.
- They must also answer the 11 questions the tagger has set for them.
- They must create 11 more questions to ask bloggers they have decided to tag.
- They must then choose 11 special bloggers to tag & award with the Liebster award with less than 200 followers.
- These lucky bloggers must be told in a comment on their blog.
I'll start with 11 things about myself.
- I speak Dutch. I lived in the Netherlands for a year and a half, learned their language and fell in love with the land of Tulips.
- I adore goats. I wish I could have one and hope eventually our city will make the changes that will allow miniature goats to be kept in residential neighborhoods.
- I homeschooled for over 15 years and loved most of it. The benefits are that I have wonderful children.
- I also adore English Angora rabbits and do have one. His name is Alfred and I am making a scarf from his wool, although it may take five years at the present rate.
- Pioneers and pioneer life are fascinating to me. I love volunteering at our local historical park where I dress the part and teach visitors about history.
- I am rewriting my book Lost Generation. Hopefully I will start submitting it soon.
- I've also been working on a new book, Secrete of Kadonya (the name will probably change).
- Herbs are interesting to me. I love to study them and learn to use them more proficiently.
- I have been making soap, lotion, lip balm and related items for many years now. Working on formulating a great herbal lotion and I think it is going well.
- The Grand Tetons is one of my favorite places in the world. I spent three summers working at one of the lodges when I was younger.
- Home is probably my most favorite place.
- Name a historical figure that you admire, and tell why. Helen Keller. I admire her, but also her teacher and the tenacity they both had.
- What are the names of some of your favorite books or stories from childhood? My very favorite was The Velvet Room. I also loved the Bobbsey Twins Series.
- Describe your idea of an ideal day. This is hard, because if I had to do the same thing every day, I'd get tire of it. So I guess the ideal day is one where I am doing something new or interesting and having time to spend with my family.
- What are your pet peeves? When the deer eat my garden, but the city won't let me have a goat. Also when my 15 year old won't stop drumming on everything in sight.
- If you could change one thing about yourself, what would it be? I'd make sure I always believed in myself and stopped doubting that I can accomplish whatever I choose.
- Share a favorite Christmas, holiday, or birthday memory. This encompasses two memories. The Christmas I spent in Holland away from my family was memorable because I knew what I was missing at home. I lay in bed and listened to the bells ring for what seemed like hours. I still hear those bells, they were wonderful and soothing. At that time I was picturing my family at Grandma's house with all the cousins and then leaving to go home. On the way I knew they would look out at the blinking red light that was there all year, but we only ever noticed on Christmas Eve. Then they would hurry home and convince the younger siblings to hurry to bed. Isn't tradition great. My own daughter will be far away for Christmas this year.
- What's the best compliment you ever received? Probably the ones from my husband when he tells me I'm beautiful and I can see in his eyes that he believes that.
- What's your favorite meal? Pizza for sure. Although I love most Chinese food too.
- What would you do with an extra 3 hours today if you had it? Probably read or write. It would be really cool if I had that three hours with my children and could read a book with them like we used to.
- Name a place you'd like to visit. I've always wanted to visit China.
- Name a goal you'd like to accomplish or a skill you'd like to learn in the next 2 years. This one is easy. I would like to see my book published.
I'm loving this. I hope the people I nominate have as much fun as I have. Here are my nominees (actually they are coming one at a time):
- http://getyourcraptogether.blogspot.com/
- http://craftdiscovery.blogspot.com/
- http://www.coleyscorner.com/
- http://icingonthecakedallas.blogspot.com/
- http://littepileseverywhere.blogspot.com/
- http://generationpromisegenealogy.blogspot.com/
- http://onehotcrafty-mama.blogspot.com/
- http://www.saraclosetblog.com/
- http://rockwellali.blogspot.com/
- http://www.craftynester.com/
- http://texasjoy.blogspot.com/
And here are their questions.
- What is your favorite Christmas tradition?
- What memory from your childhood makes you smile?
- Who is your favorite character from a book?
- Name a place you've visited and would love to see again.
- What hobby do you enjoy?
- Name your favorite song?
- What is your favorite dessert?
- Name a color you choose often.
- Name a person from history you see as a hero. Why?
- Do you have a favorite animal? If so, what?
- What are you currently obsessed with?
Thursday, November 29, 2012
Peace in Family Life

In a world of chaos, peace may sometimes seem fleeting. Peace between countries. Peace between neighbors. But without even considering any of these, I often wonder how to achieve peace in family life.
When children are very young you may long for peace from crying and diaper changing. You may embrace that freedom that comes as they find independence and accomplish more and more for themselves. As they become teenagers finding peace in family life becomes a different kind of challenge.
Teens are figuring out who they are. Sometimes they don't agree with what is expected of them. They bicker with siblings, disagree with parents, tease and prod, drum and screech and just make noise for the fun of it. They must explore the world at home and outside the home to find their place in it. It's an exciting, frustrating time for parents.
But somehow in all of that it seems important that they also learn to be peaceful. To feel peace within themselves and help create it with those around them.
There are so many opportunities for our youth today. This is a blessing only when we choose carefully which obligations to fill our schedules with and which to let our teens fill their schedules with. Over scheduling does much to keep us from finding peace.
If only we can hold onto dinner time and those few other moments when the family comes together. It may not always feel peaceful, but our youth need parents to treasure those times when a family gathers together. Parents must protect this valuable time. In a few years they will be on their own. Gone from our protective influence.
Finding peace in family life is more important than it has ever been.
What specific things help establish that feeling of peace in the home? Here are a few ideas.
- Calming music in the background can change how we feel and deal with others.
- Personal prayer or meditation helps bring peace on a personal level and should be encouraged.
- Hold on to dinner time. Even if it doesn't seem peaceful. Don't let life get in the way of spending time together as a family.
What do you do to encourage peace in your home?
Wednesday, November 28, 2012
Take Great Pictures
I've been on a quest to learn to take great pictures for my Etsy shop. I've still got much to learn, but wanted to share what I did with my lighting. Somebody on my Etsy team sent me some information about building a light box from a cardboard box and I gave it a try.

I realize the picture of the light box is not a great picture. But the pictures taken using the light box are dramatically improved.
I actually used two boxes and just pieced them together with a lot of glue and a glue gun. As you can see from the photo, the main idea is to have the sides framed in cardboard and they lined with white fabric that will let the light shine through. The top is also framed and lined with white fabric, although I haven't arranged a light on top.
I'm using the light from the window, which is south facing and seems to work best in the afternoon when I can open the curtains and get light without direct sunshine. Then I turn the halogen work lights on. There is one on each side. Although they heat up pretty quickly and I've been nervous about them being that close to the fabric. I only keep them on when I am actively taking picture and staying right there. Once I did all that I was getting pretty close, but the pictures still weren't quite what I wanted. I was aiming for that white background that makes the item pop. I asked a photographer friend for some help and she added a flash. I'd been doing everything to avoid the flash. But with all the other lighting I'd added, it seem to just eliminate the rest of the shadows without washing out the item. Ususally. I'm still playing with it. But I've managed to take some pretty nice photos with it.
Take a look at this.
Here is a picture with just the light from the window.
 This one is with the window and the flash.
 And this one is with the window, the halogen lights and the flash.

What other ideas do you have or tricks do you have to make your photos the best they can be?

I realize the picture of the light box is not a great picture. But the pictures taken using the light box are dramatically improved.
I actually used two boxes and just pieced them together with a lot of glue and a glue gun. As you can see from the photo, the main idea is to have the sides framed in cardboard and they lined with white fabric that will let the light shine through. The top is also framed and lined with white fabric, although I haven't arranged a light on top.
I'm using the light from the window, which is south facing and seems to work best in the afternoon when I can open the curtains and get light without direct sunshine. Then I turn the halogen work lights on. There is one on each side. Although they heat up pretty quickly and I've been nervous about them being that close to the fabric. I only keep them on when I am actively taking picture and staying right there. Once I did all that I was getting pretty close, but the pictures still weren't quite what I wanted. I was aiming for that white background that makes the item pop. I asked a photographer friend for some help and she added a flash. I'd been doing everything to avoid the flash. But with all the other lighting I'd added, it seem to just eliminate the rest of the shadows without washing out the item. Ususally. I'm still playing with it. But I've managed to take some pretty nice photos with it.
Take a look at this.
Here is a picture with just the light from the window.


What other ideas do you have or tricks do you have to make your photos the best they can be?
Wednesday, October 31, 2012
Red Riding Hood Cape

Here's how I made the cape.

Layer the hood pieces in sets of two. Stitch around the back and top sides (the curved edge) of each set.


Viola! Red Riding Hood cape. A fun costume for the right occasion.

Friday, October 19, 2012
Crock Pot Chicken Parmesan

While looking at links from the Sugar & Spice Link party I came across a recipe for Crock Pot Chicken Parmesan. I thought it the perfect idea for dinner, but with some personal changes. I have my own marinara sauce that the family adores. It's one of the recipes both of my daughters who are now away from home have asked for. But I wanted to cook it before I added it to the chicken. Here is what I came up with.
I happen to own two large crockpots. So I made the marinara sauce in one as follows. (This is a big batch!)
3 quarts tomatoes
3 small onions
3 small peppers
1 t. basil
1 t. oregano
1 t. thyme
7 bay leaves ( I know that sounds like alot, but we like it that way.)
2 T. vegetable oil
2 T. sugar
1 t. salt
1/2 t. pepper

I throw it all into the crockpot and let it cook for hours until we are ready for dinner. Sometimes I add ground beef, or meat balls. Other times I start with chicken breasts cooking in the crockpot and add these ingredients for Chicken Cacciatore. Today I will cook the chicken for awhile in a separate crockpot and then add the sauce when I'm ready.

However, I did one other thing different today. I have some grated zucchini in the fridge, so I threw a couple handfuls of that into the sauce.
I cooked the chicken as follows.
6 slices bread ends (I save the ends of the loaf and keep them in the freezer for this purpose.)

Blend until crumbs.
Add:
1/2 cup grated parmesan
1 t. salt
1/2 t. pepper
1 T. basil
1 t. oregano
Mix this together.
Mix an egg for every chicken breast in a separate bowl. I did six.

Dip each chicken in egg and then the bread crumb mix. I re-dipped in the eggs and the bread crumbs so it would give it an extra coating.
Add 1 T. vegetable oil to the crockpot and lay the chicken into the crockpot.
After about three hours, layer mozzarella cheese over the chicken breasts. Add the marinara sauce from the other crockpot.
If you don't have two crockpots, you could easily cook the marinara sauce on the stove and then add it to the crockpot.
Serve over pasta.
Monday, October 15, 2012
Got My Goat

It started out that I wanted to sell the tote bags I've been making. But it ended up being a modge podge of wares: bags, juggling balls, lotion and balms, and an effort to legalize miniature goats in Tooele.
The goats took the show. If you want to read more about the goat effort, visit Tooele Goat Justice League blog.
Wednesday, October 10, 2012
Jumprope from Grocery Bags
Need to find a great use for your grocery bags? Love to recycle in a creative way? Here's one idea. This simple jumprope has been a hit year after year with my kids and their friends. It's nice and heavy and they love that I can make it whatever legnth they want.
 In this picture you can see that I've started the jumprope and finished the handle on one end. To complete this jumprope I will finish braiding the pieces of grocery bag into the rope until it is the desired length and then fold it over and duct tape around the doubled rope to create the handle.
 Here's how I do the braid. I cut each grocery bag into four pieces. I like to cut it from top to bottom. I first lay it out so it is flat with a handle on each side and cut from top to bottom. Then I cut across the bottom and up the sides, snipping the handle in half at the top. I cut a bunch of these before I start braiding. The first part of the braid is always too thin and I end up cutting it off and getting rid of it. To begin, I take three pieces of cut bag and tape the handle end together. I like to attach that taped end to something, such as a chair, to keep it secure while I braid. As I braid, I quickly add more cut bags into my braid, adding them at the handle end. When I braid the new bag in, I fold the handle over into the braid and keep going.
As I explained above, once the rope is the desired length, cut it off with enough on each end to fold over for the handles. Duct tape around the handles using whatever color or design you like.
Do you have any other great ideas for making something fun with your plastic grocery bags?
Share your ideas with us.





As I explained above, once the rope is the desired length, cut it off with enough on each end to fold over for the handles. Duct tape around the handles using whatever color or design you like.
Do you have any other great ideas for making something fun with your plastic grocery bags?
Share your ideas with us.
Tuesday, October 9, 2012
Toxic Cleaners
Years ago I read and learned alot about toxic cleaners. At the time I heard some interesting stories about how they use certain bug sprays to test the affectiveness of military equipment, because the toxicity of these sprays is similar to what our soldiers could encounter in the field. This and other information caused me to question what I bring into my home.
Now let me clarify. I think we can go overboard with such information as well. But we live in a toxic world.
I've seen products come out in the past fifteen years that prove people are becoming more aware of this problem. I was creating my own non-toxic cleaners before these products were options. Such options can still provide inexpensive ways to clean a house without bringing the toxins in.
I wonder how much interest there is in these kinds of cleaners that you can make yourself. I'd love some feedback on this. If you think this is an interesting topic, and would like to see posts on this blog that include instructions for making your own non-toxic cleaners, please comment. Or if you know of other places on the web where this type of information can pe accessed, please include that link here.
Now let me clarify. I think we can go overboard with such information as well. But we live in a toxic world.
I've seen products come out in the past fifteen years that prove people are becoming more aware of this problem. I was creating my own non-toxic cleaners before these products were options. Such options can still provide inexpensive ways to clean a house without bringing the toxins in.
I wonder how much interest there is in these kinds of cleaners that you can make yourself. I'd love some feedback on this. If you think this is an interesting topic, and would like to see posts on this blog that include instructions for making your own non-toxic cleaners, please comment. Or if you know of other places on the web where this type of information can pe accessed, please include that link here.
Monday, October 8, 2012
Spinning English Angora


If you have done any spinning, and blogged about it, I invite you to post your link here.
Tuesday, September 25, 2012
Crocheted Dishrag Pattern


Skip on stich and single crochet into the next stitch.
Chain one.
Single crochet into the next stitch.
Continue this pattern to the end of the row.

Continue until you have a perfect square, (20 rows).

Chain one and rotate to the right. Single crochet in the first stich going down the side of the dishrag. Single crochet in each stitch after that all the way around the dishrag.
Single crochet around the dishrag a second time, creating a second row.
Tie off at the end and weave the loose yarn into the dishrag so it is not visible.
Enjoy!
I love these dishrags.
Subscribe to:
Posts (Atom)